based on the proposal that we have pass up, miss nina have pick the idea of the pineapple sauce as our project to be proceed.
we are choosing pineapple as our main base for our recipe. then, we come up with an idea to create pineapple ketchup sauce.
here i would like to attach the recipe.
1.one whole of pineapple
2. 3 number of red chilli
3. 2 pieces of bay leaf
4. a little bit of vinegar
5. a pinch of salt and sugar
then come to the day that we have to experimental our idea.
.friday 26 feb 2010.
we start our class as usual, we gather and hear the briefing from miss nina.
we start to take all the ingredients that we have order.
here the method how to make the pineapple sauce.
first,clean the pineapple.

cut the pineapple to be saute. 
saute the pineapple with a little bit of oil until it become shiny and darker.
blend the pineapple until become very soft.
at the same time, blend also the red chilli. and also, cut the garlic.
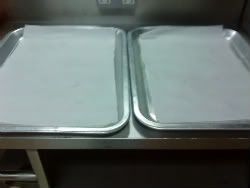
here are the picture of all ingredients.
time for cooking.
method for preparation.
1.first saute the garlic with a little oil.
2. then put the blended pineapple in the pan.
3. put the bay leaf inside the pan.
4. then put the red chilli,vinegar,sugar and salt.
5.wait until the colour change. then ready to be serve.


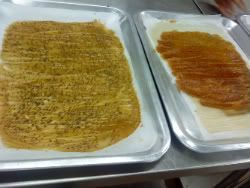
-here are the sauce that are ready to be serve-
on that day also we are serving fried prawn.

our own evaluation:
based on our observation, we think that our pineapple ketchup sauce is need to be improve.
the texture is a little bit rough. we should blend it more soft. the taste also less spicy. we should replace the red chilli with bird eye chili. and we also should increase the usage of the pineapple.
wait for our next report soon.
Sunday, February 28, 2010
our own food innovation ( 26 feb 2010)
Sunday, February 14, 2010
12 FEB 2010 (3rd experimental)
fruit leathers
now we have reach into our last experimental based on the notes given. the topic for today is fruit. leather. every each group have given a task to form a fruit leather. each group have get different types of foods. there are strawberry,peach, apple and kiwi. my group have pick kiwi to proceed this task. for this week the task a little bit simple. we just need to replace one of the ingredients and try to differentiate it.
2 1/2 cup or 8 kiwi ( cut into half)
25 g of sugar
2nd procedure ingredients:

2 1/2 cup or 8 kiwi ( cut into half)
30 ml honey ( replacing the sugar)

these are the ingredients for both procedure
method:
1. blend the fruit inside the robot coupe. wait until it become smooth.
2. wait it till it become smooth.
3. then mix up the sugar into the machine.
4. and blend it again till more smooth
(repeat the same method of preparation for the honey)

after preparing the tray for placement the blended fruit.
pour the blended in the tray.
one tray for sugar kiwi,one for honey kiwi
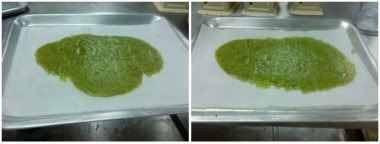
then,spread the blended fruit.
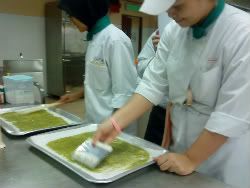
ready to be bake.
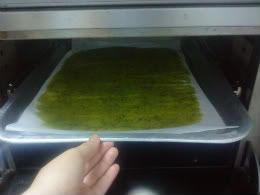
we have start baking at 09.50 a.m with the temperature of the oven 60'c.
every 1 one hour we will check on the fruit leather.
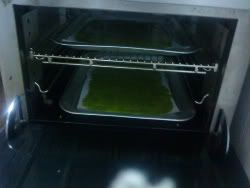
our baking time only takes 2 hour and 40 minutes.


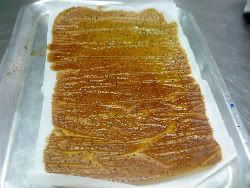
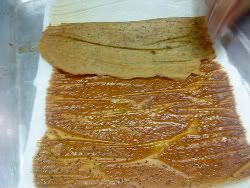
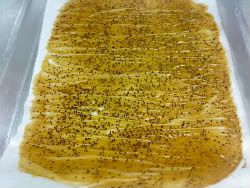
the evaluation time:

1st: kiwi with honey. its cook a few minutes earlier than the other one. the colour is also very dark. golden dark brown. looks shiny. the texture is crispy, smooth.
2nd: kiwi with sugar. the cook time longer a bit. the colour is lighter. but still brown. not very shine. less crispy but its sticky.


Saturday, February 6, 2010
5 FEB 2010 ( 2nd Experimental)
here we go with our next experiment on the next class. our topic on that day was bread. as usual, we have been given 3 task. based on the different procedure. here we would like to attach the basid formula how to make the bread.
7 g ( 1pkg) Yeast,dry
118 ml (1/2c) water at 35'c
4 g ( 1tsp) shortening
6 g ( 1 1/2tsp) sugar
3 g ( 1/2 tsp) salt
200 g ( 1 7/8 c) all purpose flour
1st procedure: the bread is prepared using the basic formula. but the bread is only form until it become a dough without any kneading at all.

method :
1. First separate the water into 2 cups. one 59 ml and the other one 59 ml.
2. add the first 59 ml water with yeast. at the same time melt the shortening.
3. place and mix sugar,salt and the flour together in a bowl.
4. then slowly adding the balance water and the melt shortening.
5. blend it together. add enough flour until it soft and smooth.
6. form the paste until it become a dough.
7. rest it for 30 minutes for twice.
8.and ready to bake.

after the paste have become a dough.
2nd Procedure: prepare all the basic ingredients to make the bread. but the differents is the paste will be kneading for 50 times after it have be form as a dough.

method :
1. First separate the water into 2 cups. one 59 ml and the other one 59 ml.
2. add the first 59 ml water with yeast. at the same time melt the shortening.
3. place and mix sugar,salt and the flour together in a bowl.
4. then slowly adding the balance water and the melt shortening.
5. blend it together. add enough flour until it soft and smooth.
6. form the paste until it become a dough.
7.after that kneading the dough for 50 times. count it properly
8. cover the dough with aluminium foil.rest it for 30 minutes for twice.
9.then bake it.

after 50 kneading.
3r procedure: prepare the basic formula of the ingredients again. but beside kneading for 50 times before this, the dough must be kneading 100 times.

method :
1. First separate the water into 2 cups. one 59 ml and the other one 59 ml.
2. add the first 59 ml water with yeast. at the same time melt the shortening.
3. place and mix sugar,salt and the flour together in a bowl.
4. then slowly adding the balance water and the melt shortening.
5. blend it together. add enough flour until it soft and smooth.
6. form the paste until it become a dough.
7.after that kneading the dough for 100 times. count it properly
8. cover the dough with aluminium foil.rest it for 30 minutes for twice.
9.then bake it.

after 100 kneading. the dough is ready to be rest.

after almost 1 hour rest for 2 times. the dough is place inside the case. and ready to be bake.

while waiting for the bread to bake.
as usual, after finish baking for 45 minutes, we have place all our bread on the table and ready for the evaluation.
bread using method 1-no kneading-

the colour of the bread not turn into golden. the crust is a little bit rough. but when we cut it, the filling soft and sticky. the cell size is really close to each other.
bread using method 2-kneading 50 times-

the colour is little bit brown from the first one, the crust also is rough. after cut it, the interior cells also rough. there are less air cell between each cell. and the cell size is really small.
bread using method 3- kneading 100 times

the result of the bread after kneading 100 times. the bread become a little bit rough than the bread in second method. and its a bit hard to cut it become of the outer surface. the crust is rough. the colour also not really brown or golden. while the interior cell also very close and full. not sticky and dry inner surface.
thanks the end of our evaluation based on the 2nd exprimental. here i also attach the picture during the evaluation period.


Subscribe to:
Posts (Atom)
